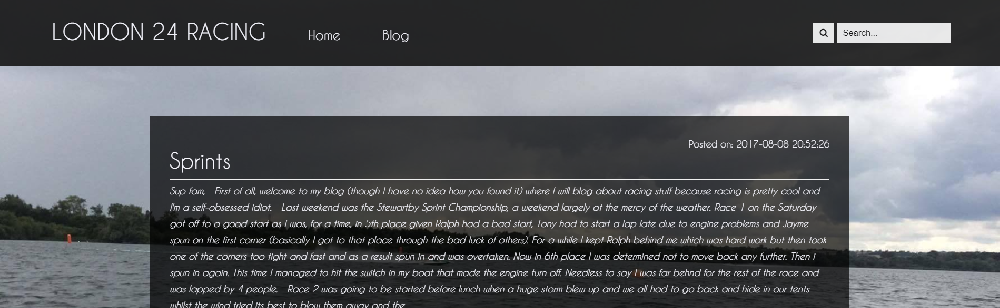
Designing the blog for london24racing.com
Now that the main page for london24racing.com was sorted out, I moved onto create the blog which would be similar to this blog, with some improvements to the styling. It would use a similar backend with a CMS (content management system) that will allow the admin to create, edit and remove posts from the site, all using a tinyMCE editor in the web browser.
The frontend of the blog would feature the ability to view previews of the posts, click a read more button that would display the full posts content along with any images, video or other embedded media in the post, and a search bar that would allow the user to search through the keywords of the posts to find a specific post (I think I said “post” way too much there). There would also be a feature I wanted to implement on my blog that I never got around to, which would limit the initial amount of blog posts loaded and have a “view more” button that would display a couple more. So for example, the main blog page would start off with the 3 most recent posts visible, and then there would be a button that would load 3 more.
The frontend
The frontend from a functionality perspective works much the same to this blog, or at least the current version of it. There is no comment system currently, no “subscribe” form or anything like that, those features may be added in the future but for now it’s just a plain old blog. One feature that took me a while to implement was the load more posts button, as I hadn’t really used AJAX calls before this. However, it was simple enough to figure out and it works like a charm, with the exception of the load more button showing up when there are less than three posts (but we won’t focus on that 😉).
The design of the frontend is something that I am generally quite pleased with. It follows a very similar style to the main webpage, using the same colour scheme and general design. There is a top bar that is slightly opaque, that contains the title, the links for the blog and a link back to the main page, and the search bar for searching through the blog. Then the preview for the blog posts are below, Along with the button on each post to real more of it. The background image stays consistent throughout the blog, however in the future I think it’d be cool to have the background be randomly selected each time the user goes to a new page/post. We’ll have to see on that one though.
The design is fairly responsive and it works fully on my phone, with no issues. Whilst it works on all displays in the chrome developer mode, I did notice that the design broke a bit on an older phone I tested it on, although this could just be because the browser was outdated.
View from iphone 5
The Backend
The backend to the blog has almost identical functionally to this blog, which I wrote about here.
There is a login screen that requires a username and password, and once the correct username and password have been entered the user can access the content management system. In the content management system, the user has the ability to create, delete and see the details of a post from the dashboard, or they have the ability to create a new post on the “Create Post” section, where they can specify the posts title, keywords for searching purposes and the content of the post using the WYSIWYG editor (which we’ll get onto soon).
The main difference from this CMS and the one for this blog is the design, which doesn’t use a standard bootstrap theme and was built from scratch, and in my option looks much cleaner. I didn’t bother making the backend responsive or mobile-friendly, as the tinyMCE editor used to edit the blog posts is not currently working on mobile devices anyway. However, I do believe that tinyMCE are working on a mobile version of the editor, so this may be something I’ll do later on.
The Editor
The WYSIWYG (What you see is what you get) editor allows the user to enter in the content for the blog post, which is then converted to HTML and sent off to the database. The editor I’m using is called tinyMCE, which can be found here. I’ve added many plugins to the editor, some of which are trivial in nature and just add extra features like emoticons and changing the colour of text, however there are some more important plugins like the spellchecker and the file manager.
The file manager allows for the uploading of images and other media that will be contained in a blog post. The editor supports standard images and video files, along with other media formats such as audio files. Another useful feature is the ability to add embedded code, such as a YouTube video, under the “insert media” option.
HTTPS, SSL, Passwords and Security
Security was a little bit of a pain to set up, but the site seems to be fully secure now. There are two main parts to the sites security, the encryption of the password and the SSL certificate.
The password that is given when logging in is hashed using a system called bcrypt. Bcrypt was used instead of MD5, because every shmuck under the sun knows that MD5 is extremely insecure and can be brute forced pretty easily.
For an example of how insecure and vulnerable MD5 is, check out this site. Type in a password, and the site will generate the MD5 hash from it.
Now take that MD5 hash and enter it into this site, which has a massive database of cracked MD5 hashes. There is a pretty good chance that the database will have the password you entered in there.
Even if you can’t be bothered to do that, trust me it’s insecure. Bcrypt is a much more reliable and safe option, as it’s invulnerable to rainbow table attacks (basically mapping hashes to text) and cannot be brute forced in the way that MD5 can.
So, the passwords are encrypted with bcrypt. But there is no SSL certificate, and no HTTPS connection. This is pretty insecure, as any data that passes from the client to the server is in plaintext and is not encrypted at all, meaning any would be hacker could have a field day, especially with some sort of man-in-the-middle attack. However, godaddy (the web hosting service I am using) charges quite a bit for their SSL certificates, and neither me nor the client for London24racing particular want to pony up for it.
The good news is there is a free way to get an SSL certificate for the site, using a service called letsencrypt. Because of this, we were able to get a fee SSL certificate and secure the login to the site. I will probably make a blog post about how to do this in the near future, and when I have I’ll leave a link here.
Hell yeah
Conclusion
To conclude, I think the blog that I have designed for London24racing.com is pretty good. The client was pretty happy with it, which is always a good sign. They have made their first blog post over there, and I look forward to many more!
I learned a lot designing this blog, some of which I’m going to implement when I redesign this blog (which will be the next thing I focus on doing). Some of these things include getting a proper SSL certificate, redesigning the site to look much cleaner than it does now in general, making the background image fixed like in the london24racing blog, having it so only 3 or so posts load and adding a “load more” button, and finally getting those other sections of the site functional. So look forward to that!