The PHP Blog and Basic CMS
Introduction
This is the first post about this very website you’re reading, and how I made the blog component of it using PHP, and the CMS (content management system) that works on the backend that I’m writing these very words on!
I decided to build this blog to help me document all of the work I’ll be doing in the future relating to technology, as this will help me catalogue topics I’ve covered and projects I’ve completed. As I was wanting to start off by developing web applications and taking my basic HTML/CSS/JS skills further, I decided to go with PHP for the server-side language, as there were more tutorials and resources available to me and it seemed much less daunting than ASP.NET. I still want to learn ASP.NET soon, as I’m already comfortable in C# and Visual Studio, but learning PHP too will be another skill I’ve got under my belt, so I decided to start off here (Another reason I decided to go with PHP is that I’ve got a Linux hosting plan, and at the time I wasn’t sure if I could even run ASP.NET on a Linux server).
Setup
To start off with, I used XAMPP to locally host the website until it was ready to deploy to the server. This allowed me to make changes and instantly see the results instead of having to wait to upload to a web server every time I make an adjustment. It also let me set up the databases locally, which I then simply exported as a SQL file and could import into the PHPmyAdmin on the server.
I used PHPStorm as my IDE, although an IDE wasn’t really necessary for this project, I still found many of its features such as autocompletion to be very effective at helping me spend less time typing out things fully. This will also have the effect of giving you suggestions for certain bits of code, allowing you to explore options much easier (a great example of this is PHPStorm’s colour selector, which lets you browse colours or select your own from a colour wheel right there as you’re typing the CSS). It may not sound like much, but trust me, it saves time both in typing out stuff and looking up colour hex code or a CSS property.
The Frontend
Let me start of by saying that when starting this project, I wasn’t very well versed with PHP or server-side programming in general. What little web development I have done in the past has all been the bare bones basic stuff, like HTML, CSS and JavaScript with a bit of jQuery. I have made websites in the past, using only front-end technologies such as HTML and CSS to design webpages, as well as adding JavaScript for some interactivity, but this was the first proper project where I could use a language such as PHP to fetch and post data to and from a SQL database.
The first order of business was to get the HTML and CSS up and running. I used bootstrap to help with the styling, and it wasn’t long before I had a pretty basic but ok looking site. I’ll probably update the layout in the future, but for now it’s functional. I added a search bar that would eventually fetch all related results in one place too.
Next step was implementing the posting system, but before I could go coding in PHP I needed to set up the database. This was the first time I have worked on a SQL database (or any database for that matter) but after a while of looking up tutorials and faffing around with it for a bit I got the gist of it.
Once the database was set up, the next step was fetching posts from it. To do this, I used a SQL query that fetched the posts from the database and used a while loop to print them all out onto the blog with the correct styling and HTML. It would also cut the post off after a set amount of words and add a “…” to the end of the string so the full post doesn’t display. Next, I set up the “read more” button you get under each post, so that it will take you to the full post on a separate page, that will have a simple back button where the read more button would be that would take the user back to the home page.
Next, I set up the search feature. This works by using keywords, each post will have some keywords and the search feature will go through all of the posts and find ones with matching or similar keywords. If no results can be found a message will display telling the user that the search couldn’t find anything.
That pretty much covers the frontend, now for the much more exciting backend and CMS.
The Backend
The backend uses a basic bootstrap template called dashboard (image below) which I removed most of the stuff from as I only really needed two tabs, one to display all of the posts and one for creating new posts.
THE DASHBOARD TEMPLATE
MY FINAL DASHBOARD PAGE
The posts section simply displays all of the posts on the site in a table, along with options to edit and delete any of the posts. When a post is created, it is also added to a backup table in the database, so if a post is accidently deleted then there’s still a copy that can be manually copied over from the PHPmyAdmin interface.
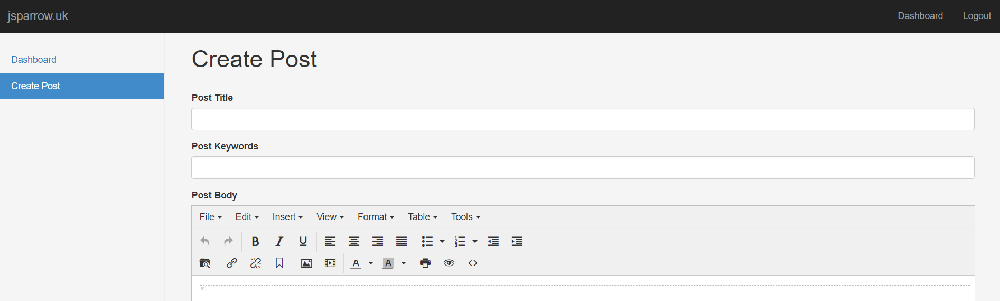
The edit posts section uses a text editor called tinyMCE, which allows you to write out blog posts in a web text editing interface and then convert it into HTML. This allows me to quickly and easily add posts to the site without having to worry about formatting the posts into HTML all the time.
Here I can enter the title, keywords, and body of the post, which allows me to add images and videos, as well as other media, to the body. This means I can create high quality posts using all one interface, however I do have to option of looking and editing the core HTML if need be.
Features I want to add in the future
Currently, the security of the site could be improved. Whilst the password is not hashed using MD5, as this is very insecure, the sign in page still only uses HTTP and not HTTPS, which I’ll change in the near future.
Currently, the home page displays all posts in the database. In the future, I want to have it so it will only display the first couple of posts, and then a “view more” button will allow you to see a couple more ect.
But most importantly, I need to get the about me, portfolio and CV pages up and running.
Thanks for reading this, hope it was interesting to some extent!
~ James